Job Details
Start by clicking on your job and selecting Details.
You will be taken to the screen below.
a. Title
- Start: Selecting this will initiate a one-time run of the job. Note: For jobs that will take time to run, you will see a Kill button appear in the place of the Start button. Click on the Kill button if you want to stop the job from running.
- Edit: Edit allows you to see and edit the underlying configuration file that Mitto uses to run the job itself.
- Remove: This action will remove the job. Caution: Deleting will permanently remove this job.
- Logs: Logs allows you to see the log file for all the runs of the job. This is helpful for debugging and support and to check the status of a job.
- Clicking on the pencil next to the name of the job allows you to rename the job.
b. Details
- ID: Number of the job instance you have created. Mitto keeps a running track of how many jobs you have created.
- Name: Name of your job.
- Type: The type of job is set by the job type you choose initially. If you create a Query job the job type for a Query job is "io." The job type is in the configuration file - in order for a Mitto job to run, the job type needs to match the appropriate action. For this reason do not change the job type unless you need to.
- Tags: You’re able to add tags here. If you add the Stage tag, it will appear in the stage. Tags help you keep your jobs organized. Read more about Stage. Tags allow jobs to appear in certain navigation panels. Learn more about Tags here.
c. Run info
- Status: Status of the job. The OK indicates that the job ran successfully. A Failed indicates that the job failed.
- Duration: This indicates how long the job took to run.
- Started at: Gives the date and time when the job ran.
- Completed at: Gives the date and time when the job finished running.
- Count: This indicates how many rows of data there are in the job.
Scroll down further on the page to see the next sections.
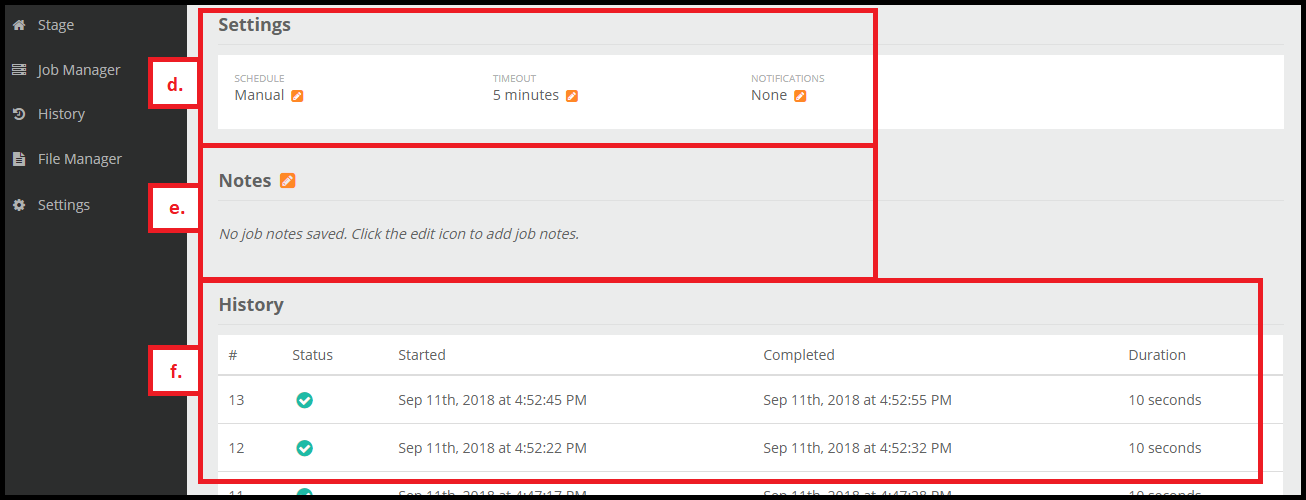
d. Settings
- Schedule: This dictates what the schedule is for this job. Some jobs can set to be run every week, day, hour, 15 minutes. You can configure the schedule to run when you want. Read more about Scheduling Jobs.
- Timeout: This will stop a job after a specified time. This is useful if you know a specific job should only run for a certain amount of time and there’s a problem if it runs longer. Note: This option exists to stop jobs from running indefinitely.
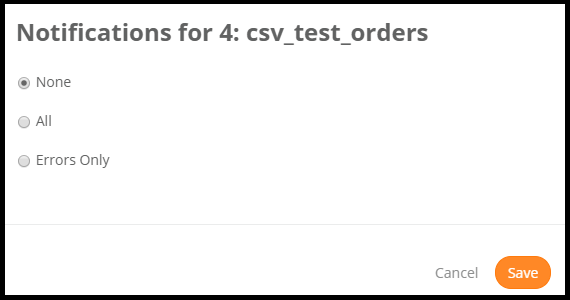
- Notification: You can have Mitto notify you on the status of your job. If you want it to notify you for errors only, select Errors Only. The All option will notify you for both successful and error runs. Read more information about how to setup your notifications here.
e. Notes
- Type any notes you’d like regarding this job. Note: You are also able to write this in Markdown format. Click on the Markdown link to see more. If you’d rather not write in Markdown format, you can proceed with typing normally.
f. History columns
- Number: This number shows how many times this job has run. Note: This is different than the instance number seen in the Using the Jobs Tab.
- Status: Status of the job. The check mark indicates that the job ran successfully.
- Completed: Gives the date and time when the job finished running.
- Duration: How long it took for the job to run


